
How to Set a Static IP Address in Windows
Setting up a static IP address on a computer network can be very helpful, especially if port forwarding is required on the network. A static IP address makes it possible for a port configuration to work, but since dynamic IPs create a new IP address each time a computer starts up, port forwarding on a network can become inoperable. Before tips on how to set up a static IP address are discussed, here is some information regarding IPs in general.
What is an IP Address?
Internet Protocol (IP) address is a number separated by periods that makes it possible for computers to identify one another. It should be noted that while each computer has at least one IP address, some can have several. The following is an IP address: 127.0.0.1.
Dynamic and Static IP Addresses
A dynamic IP address is one that constantly changes each time a computer is rebooted. A static IP address is one that stays the same. It should be noted that dynamic IP addresses are the default type of addresses due to the fact that on a network connected to a router, each time a computer starts up the router assigns a new IP address to the computer on the network.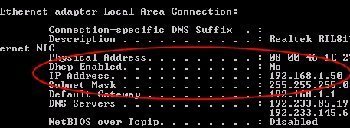
The router keeps track of the IP addresses it hands out, thereby preventing two computers from having the same IP address. If two computers on the network have the same IP address, both cannot access the Internet.
How to Set Up a Static IP for Windows
Setting up a static IP is usually a simple process. Follow these steps:
- Click the Start Button then choose Run. The Run window should open.
- Type cmd in the Run box and click OK. A new black window should open up with a prompt.
- At the prompt, type ipconfig/all and click Enter. Information related to the IP will appear. Some of this information will be needed later. Either print the screen or copy down the info for the following fields: IP address, Default Gateway, Subnet Mask, and Name Servers (Name Servers are also called DNS Servers). Once all the information has been copied or printed, exit this window.
- Click Start then Control Panel, then select Network Connections. Once the Network Connections window opens, the user’s labeled network connection will appear. Many networks and computers have more than one network connection. Choose the network connection used to connect to the Internet. Once this network connection is selected, right click and choose properties.
- Hint: If having difficulties finding the network connection that is used to connect to the Internet, one way to make a search easier is to disable one connection at a time and then test using the browser if the Internet still works. If the Internet no longer works, then the network connection disabled is the one that should be used to connect to the Internet.
- In the Properties window, select the General tab then click on Internet Protocol (TCP/IP). Once this is selected, click the Properties button.
- On this screen, choose the following radio button: Use the Following IP Address and then fill in the following information regarding:
- IP Address
- Subnet Mask
- Default Gateway
There will also be two radio buttons. Choose the radio Button: Use the Following DNS Server Address. There are two more fields to fill in, they are:
- Preferred DNS Server
- Alternate DNS Address
Once this information has been added, click OK. A static IP address has been set for Windows.
|
|
Comments - 3 Responses to “How to Set a Static IP Address in Windows”
Sorry but comments are closed at this time.