How to Install a Video Card
When you choose to install a new video card, the first thing you’ll need to do is select the video card based on the type of video card your motherboard supports.
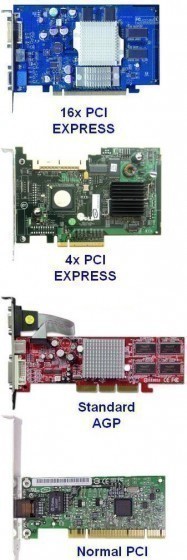
Common graphics card types are the following:
- PCI (Peripheral Component Interface)
- AGP (Accelerated Graphics Port).
- Some cards also support AGP Pro, which requires additional power, and therefore additional pins on the motherboard’s AGP slot.
- Most cards, especially on newer PCs, will be PCI Express graphics cards, also known as PCIe.
Check with your computer or motherboard’s manufacturer to verify what cards are supported in your PC. You can also consult the visual aid below for some help identifying your card.
Beginning Installation
To begin the next part of this procedure, you’ll need just one item, a phillips screwdriver.
Preparation procedures (before removing card from box): Make sure you PC is turned off and unplugged before starting. Also make sure that your body is in contact with a grounded metal object, in order to eliminate any static charge.
- Take the case cover off of your PC.
- Locate the slot according the pictures below, and remove any slides from the PC input slots that might be blocking the back of the case.
- Next, remove the card from the static-free bag that it is packaged in.
- Now that you’ve located the right slot, you can slide the card in, making sure that the tabs line up and the monitor output is facing out.
- Turn in the screw that should be attached to your case, securing the graphics card.
- Put the case cover back onto your PC.
- Plug your monitor into your new video output slot.
- Turn on your PC, verify that the screen works, and you’ve installed your new video card.
Once your video card is installed, you’ll need to skip down to the directions at the bottom of this article to learn how to install the drivers for your video card.
Plugging in the External Power Connector (Applies only to some video cards.)
Some video cards will have additional power usage requirements. These video cards are typically newer, and have more computing power.
To plug in the extra power supply to these cards, locate the six-pin connector that is attached to your computer’s power supply. It should look like the picture below.
Plug in this cable to your video card, and you’re done.
Installing the Drivers
You’ll have received a CD with your video card, which has drivers on it. A driver is a piece of software that allows your video card to communicate efficiently with your operating system.
Insert the CD, then allow it to autorun or select it in “My Computer”. When the software installation wizard appears, allow it to lead you through the installation process.
If you don’t have access to the driver CD, look up the model of your video card, and check the website of manufacturer. Most manufacturers maintain a page of driver updates on their websites.


Comments - No Responses to “How to Install a Video Card”
Sorry but comments are closed at this time.