How to Delete Duplicate Songs in iTunes
iTunes is a popular free digital media application provided by Apple for use on the iPhone, iPad, iPod, Mac and PCs. After being used for a significant amount of time users may accrue a large number of songs in the iTunes library, increasing the chances that some of them may be duplicates. Finding and deleting duplicate songs may save a significant amount of space, depending on how many duplicate songs exist.
How to Consolidate the iTunes Music Library
If users have only purchased music through the iTunes or Amazon music stores or ripped CDs, then the music files will be located in the iTunes library drive. If users acquired music from another source and then added to the library it will still be in the source folder of origin. Before proceeding with removing duplicate tracks, it is recommended to consolidate the iTunes library.
Step 1 – Open the iTunes application.
Step 2 – Click the “File” and “Library” menu options.
Step 3 – Select the “Consolidate Library” menu choice and iTunes will move any music files not in the primary music storage folder to that location.
Finding and Removing Duplicates in iTunes
Step 1 – Open the iTunes application by double clicking the program icon on your computer’s desktop or by selecting the application from the Windows Start menu. On Mac you can find it with Spotlight (Command-Space), or in the Applications folder.
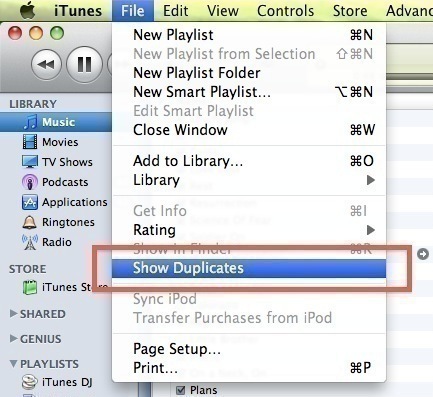
Step 2 – Select the “File” and “Display Duplicates” menu options to display the duplicate items in your iTunes library based on matching song and artist names. To display exact matches that do not include “live” and “studio” recorded versions of the song, depress the “Shift” key on a Windows computer and then select the “File” and “Display Exact Duplicates” program menu options.
Step 3 – Sort the duplicate listing by name by selecting the “Name” column at the top of the iTunes search result display. This will help you easily see the duplicates.
Step 4 – Single click the first shown duplicate, and then hold the shift key (or the Command key in Windows) while selecting other duplicates.
Step 5 – Once all duplicates are selected choose the “Edit” and “Delete” menu options to delete the selected files.
*Note if the content is synched with another device or computer, you will need to make sure that the older content is replaced with the newer songs remaining in your iTunes library.
Alternatively, you can search for a paid application to find and remove duplicate songs in your iTunes library at a cost. A danger with any automatic tool that you use with iTunes is that the application may not be able to differentiate between similar songs that are recorded at different times or locations by the same artist (typically live versus album versions of a song). Ensure you exercise due diligence and read any relevant reviews of third party applications that you consider purchasing to remove iTunes media before using the software.


Comments - No Responses to “How to Delete Duplicate Songs in iTunes”
Sorry but comments are closed at this time.