
Creating and Managing Forests and Domains
Domains and Forests
A domain in Active Directory consists of a set of computers and resources that all share a common directory database. Domains contain all the objects that exist in the network and can store a multitude of objects. Each domain contains information on the objects that they contain. A domain is also a security boundary.
Domain trees are created by adding child domains to a parent domain. Domains that are grouped into a domain tree have a hierarchical naming structure and also share a contiguous namespace.
A forest is the grouping of one or multiple domain trees. Domains in a forest share a common schema and global catalog, and are connected by two-way transitive trusts. Domains in a forest function independently, with the forest making communication possible with the whole organization.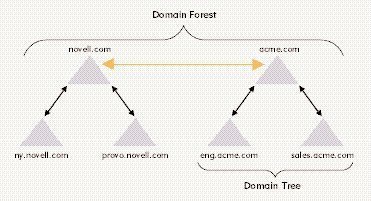
Installing Domain Controllers – domains
Because domains can only exist with a domain controller, you need to create a domain controller(s). When you create the first domain controller, you are essentially creating the domain. The domain can be one of the following:
- The root of a new domain tree.
- A child domain that you plan to attach to a particular parent domain.
- A new domain in a new forest.
- A new domain controller for an existing domain. In this case, the new domain controller is a peer domain controller. Peers provide redundancy and assist in distributing the processing load between existing domain controllers.
The Active Directory Installation Wizard is used to create a forest and domain structure. The wizard prompts for the following information when you promote domain controllers:
- Domain controller type: This is either specified as the first domain controller for a new domain, or as a new domain controller for an existing domain.
- Domain type: This can be specified as a new domain in a new forest, a child domain in an existing tree, or a new tree in an existing forest.
- Domain name.
- NetBIOS name for the domain
- The locations for the Active Directory database and the log folder.
- The default permissions for user and group objects.
- The password for the Directory Services restore mode.
How to create a forest root domain
- Click Start, Run, and enter dcpromo in the Run dialog box. Click OK.
- This action launches the Active Directory Installation Wizard.
- When the Welcome To The Active Directory Installation Wizard page appears, click Next.
- On the Operating System Compatibility page, click Next as well.
- On the Domain Controller Type page, click Domain controller for a new domain. Click Next
- On the Create New Domain page, click the Domain in a new forest option. Click Next.
- When the New Domain Name page appears, enter the full DNS name for the new domain in the Full DNS Name For New Domain box. Click Next
- You can accept the default NetBIOS name listed on the NetBIOS Domain Name page. Click Next.
- When the Database and Log Folders page opens, enter the location for the Active Directory database in the Database Folder box.
- Enter the location for the Active Directory log in the Log Folder box. Click Next.
- On the Shared System Volume page, enter the location for the SYSVOL folder. Click Next.
- On the DNS Registration Diagnostics page, verify that a DNS server does exist for the new forest. Click Next.
- When the Permissions page opens, you can choose one of the following options as the default permissions for user and group objects:
- Permissions compatible with pre-Windows 2000 server operating systems.
- Permissions compatible only with Windows 2000 or Windows Server 2003 operating systems.
Click Next.
-
Enter a password for the Directory Services restore mode on the Directory Services Restore Mode Administrator Password page in the Password and Confirm Password boxes. Click Next.
-
The Summary page appears. This is where you can view and verify the configuration options that you have selected. Click Next.
-
On the Completing The Active Directory Installation Wizard page, click Finish.
-
Click Restart Now.
How to create a new domain tree in an existing forest
-
Click Start, Run, and enter dcpromo in the Run dialog box. Click OK.
-
When the Welcome To The Active Directory Installation Wizard page appears, click Next.
-
In the Operating System Compatibility page, click Next.
-
On the Domain Controller Type page, click Domain controller for a new domain. Click Next.
-
On the Create New Domain page, click the Domain in an existing forest option. Click Next.
-
When the Network Credentials page appears, enter an Enterprise Administrator’s or Domain Admin’s username, password and domain name. Click Next.
-
When the New Domain Tree page appears, enter the full DNS name for the new domain. Click Next.
-
You can accept the default NetBIOS name listed on the NetBIOS Domain Name page. Click Next.
-
On the Database and Log Folders page opens, enter the location for the Active Directory database and Active Directory log. Click Next.
-
On the Shared System Volume page, enter the location for the SYSVOL folder. Click Next.
-
On the DNS Registration Diagnostics page, verify that a DNS server does exist for the new tree. Click Next.
-
When the Permissions page opens, you can choose one of the following options as the default permissions for user and group objects:
-
Permissions compatible with pre-Windows 2000 server operating systems.
-
Permissions compatible only with Windows 2000 or Windows Server 2003 operating systems.
Click Next.
-
Enter a password for the Directory Services restore mode on the Directory Services Restore Mode Administrator Password page. Click Next.
-
The Summary page appears. This is where you can view and verify the configuration options that you selected. Click Next.
-
On the Completing The Active Directory Installation Wizard page, click Finish. Click Restart Now.
How to create a new child domain in an existing domain
-
Click Start, Run, and enter dcpromo in the Run dialog box. Click OK.
-
On the Welcome To The Active Directory Installation Wizard page appears, click Next.
-
In the Operating System Compatibility page, click Next.
-
On the Domain Controller Type page, click Domain controller for a new domain. Click Next.
-
On the Create New Domain page, click the Child Domain in an existing domain tree option. Click Next.
-
When the Network Credentials page appears, enter an Enterprise Administrator’s (root domain) or Domain Admin’s (parent domain) username, password and domain name. Click Next.
-
When the Child Domain Installation page appears, enter the full DNS name of the parent domain and enter a name for the new child domain. Click Next.
-
You can accept the default NetBIOS name listed on the NetBIOS Domain Name page. Click Next.
-
On the Database and Log Folders page opens, enter the location for the Active Directory database and Active Directory log. Click Next.
-
On the Shared System Volume page, enter the location for the SYSVOL folder. Click Next.
-
On the DNS Registration Diagnostics page, verify that the correct DNS configuration exists for the parent domain. Click Next.
-
When the Permissions page opens, you can choose one of the following options as the default permissions for user and grou objects:
- Permissions compatible with pre-Windows 2000 server operating systems.
- Permissions compatible only with Windows 2000 or Windows Server 2003 operating systems.
Click Next.
-
Enter a password for the Directory Services restore mode on the Directory Services Restore Mode Administrator Password page in the Password and Confirm Password boxes. Click Next.
-
The Summary page appears. This is where you can view and verify the configuration options that you have selected. Click Next.
-
On the Completing The Active Directory Installation Wizard page, click Finish.
-
Click Restart Now.
How to create a new domain controller in an existing domain
-
Click Start, Run, and enter dcpromo in the Run dialog box. Click OK.
-
In the Welcome To The Active Directory Installation Wizard page, click Next.
-
In the Operating System Compatibility page, click Next.
-
On the Domain Controller Type page, click Additional domain controller for an existing domain. Click Next
-
On the Copying Domain Information page, choose Over the network, and click Next.
-
When the Network Credentials page appears, enter an Enterprise Administrator’s (root domain) or Domain Admin’s (parent domain) username, password and domain name. Click Next.
-
Enter the top level domain name to which the new domain controller is to be added, and click Next.
-
On the Database and Log Folders page opens, enter the location for the Active Directory database and Active Directory log. Click Next.
-
On the Shared System Volume page, enter the location for the SYSVOL folder. Click Next.
-
Enter a password for the Directory Services restore mode on the Directory Services Restore Mode Administrator Password page. Click Next.
-
The Summary page appears. View and verify the configuration options that you selected. Click Next.
-
On the Completing The Active Directory Installation Wizard page, click Finish. Click Restart Now.
How to raise the domain functional level
-
Open the Active Directory Domains and Trusts console.
-
Locate and right-click the domain whose functional level you want to raise, and choose Raise Domain Functional Level from the shortcut menu.
-
Use the Select An Available Domain Functional Level list box to choose a new domain functional level. Only those domain functional levels that can be specified for the domain you are working with are listed here.
-
Click Raise. Click OK.
How to raise the forest functional level
-
Open the Active Directory Domains and Trusts console.
-
Right-click Active Directory Domains and Trusts in the console tree, and click Raise Forest Functional Level from the shortcut menu.
-
Select a new forest functional level. Only those forest functional levels that can be specified are listed in here.
-
Click Raise. Click OK
How to change the domain naming master role
The domain controller that is assigned the domain naming master role controls the adding and deletion of domains in the forest.
-
Open the Active Directory Domains And Trusts console.
-
Right-click Active Directory Domains And Trusts in the console tree, and click Operations Master from the shortcut menu.
-
When the Change Operations Master dialog box opens, you will see that the Domain Naming Operations Master field contains the existing domain controller serving this role.
-
Click Change.
-
Select a new domain controller for the role.
-
Click Close.
How to change the schema operations master role
The domain controller that is assigned the schema master role controls the changes that are made to the Active Directory schema.
-
Click Start, Run, and enter regsvr32 schmmgmt.dll in the Run dialog box. Click OK.
-
The schmmgmt.dll is now registered and you can create the Active Directory Schema MMC.
-
Click Start, Run, and enter mmc in the Run dialog box. Click OK.
-
On the File menu, click Add/Remove Snap-in, and click Add.
-
Double-click Active Directory Schema. Click Close and click OK.
-
Open Active Directory Schema.
-
In the console tree, right-click Active Directory Schema and click Operations Masters from the shortcut menu.
-
Click Specify Name and enter the name of the new schema master. Click OK.
-
Right-click Active Directory Schema again, and choose Operations Master from the shortcut menu.
-
Click Change. Click OK.
How to demote a domain controller
If you demote an existing domain controller, you are basically removing Active Directory from it. Domain controllers can be demoted to either standalone servers or member servers. A member server still operates in a domain. The difference being that it does not host a copy of the Active Directory data store. A demoted domain controller will become a standalone server if it is the last domain controller in a domain. Removing Active Directory from each domain controller deletes the Active Directory directory database and the domain.
Use the steps below to demote a domain controller:
-
Click Start, Run, and enter dcpromo in the Run dialog box. Click OK.
-
When the Welcome To The Active Directory Installation Wizard page appears, click Next.
-
A message appears when the domain controller is a Global Catalog server. The message states that you should ensure that users of the domain can access other Global Catalogs before removing Active Directory. Click OK.
-
When the Remove Active Directory page appears, click the option if this server is the last remaining domain controller within the domain. Click Next.
-
When the Application Directory Partitions page opens, click Next to continue with the process of deleting the Application directory partitions shown on the Application Directory Partitions page.
-
On the Confirm Deletion page, click the option to delete all application directory partitions on the domain controller. Click Next.
-
Enter the appropriate password on the Administrator Password page. Click Next.
-
When the summary page appears, click Next.
-
Click Finish.
|
|
Comments - One Response to “Creating and Managing Forests and Domains”
Sorry but comments are closed at this time.