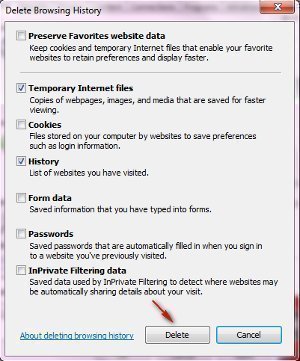
How to Delete Internet Explorer Temporary Files
Whenever Internet Explorer is used to browse the Internet and view pages, a copy of the most frequently visited web pages’ files and graphics are automatically stored by in the computer hard disk. As such, when a particular web page is requested, Internet Explorer just pulls the required graphics and files up from the temporary Internet files folder located in the hard disk instead of loading the entire page and its elements from the Web. This facilitates easier transition from page to page if multiple tabs are open. This also makes loading frequently visited pages faster.
Internet Explorer also has the capability to store full web pages for offline viewing. The elements, files and graphics of these pages are also stored in the temporary Internet files folder.
Viewing Temporary Internet Files
Viewing temporary Internet files is very easily done. To view the temporary Internet files stored in a computer, open the temporary Internet files folder. This folder can be found through Internet Explorer or through the Control Panel.
To view and open the temporary Internet files folder, open a internet Explorer window or the Control Panel. On the Internet Explorer toolbar, click the Tools option and scroll down to and select Internet Options. On the Control Panel, look for and select the Internet Options icon.
After clicking the Internet Options menu, a small pop-up window named “Internet Options” with seven tabs will appear. The General Tab is the default tab in the Internet Options window. There are three sections here: Home Page, Temporary Internet Files and History.
Under the Temporary Internet Files heading, click Settings. A new window should appear. Select View Files. This will open the Temporary Internet Files folder or window and display all temporary Internet files stored in the computer disk.
Deleting Temporary Internet Files
While in the Temporary Internet Files folder or window, select Edit from the toolbar and scroll down to Select All. This will highlight every item in the temporary Internet files folder and a “Delete the selected items” option will appear. Click this to delete all temporary Internet files.
Another way to do this would be to go back to the Internet Options window (the window that appears after clicking Internet Options in Internet Explorer or Control Panel). Under the Temporary Internet Files section, click the Delete Files button. The “Delete Files” window will appear.
On this window, you are given the option to “delete all offline content.” Clicking the “delete all offline content” checkbox will remove all temporary Internet files from the hard disk including those files necessary to properly viewing pages which were designated to be available offline. Leaving this checkbox blank will result in the deletion of all temporary Internet files except those files which are associated with pages that Internet Explorer has stored for offline viewing.
Click OK and wait for Internet Explorer to delete temporary Internet files. This may take a few minutes. After deletion is confirmed successful, click Ok in the Internet Options window to close it.


Comments - No Responses to “How to Delete Internet Explorer Temporary Files”
Sorry but comments are closed at this time.