
Planning for ISA Server Installation
ISA Server Planning Overview
When planning your ISA Server installation, there are a number of factors that you need to consider and others that you need to determine:
- How network topology needs to be configured to incorporate ISA Server.
- The size of the network.
- How you are going to achieve Internet connectivity.
- The needs and requirements of users.
- Active Directory integration requirements.
- The different ISA Server installation options. Is ISA Server going to be as a standalone server or an array?
- ISA Server array considerations (if applicable).
- The ISA Server mode.
- Modifications that have to be made for clients.
- Hardware requirements and the number of computers required for your installation.
- You might need to include publishing servers behind the ISA Server installation.
- Interoperation requirements with regard to other services.
The minimum system requirements for installing ISA Server are listed here: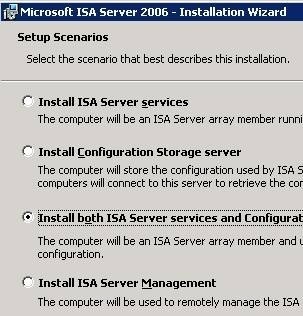
- A Windows compatible network adapter for communications with the internal network.
- For communication with the Internet.
- External network adapter.
- Intenet connection.
- To make the Web cache more secure, you should use a hard disk volume formatted with NT file system (NTFS).
- 300MHz of higher Pentium II compatible CPU.
- 256 MB of RAM.
- 20MB of hard disk space – excludes space for the ISA Server cache.
Strictly speaking, you do not need two network cards installed in the Windows computer before you install ISA Server. You only need two network cards if you are planning to install ISA Server as a dedicated firewall:
- One network card is needed as the interface on the external network.
- One network card is needed as the interface on the internal network.
You should configure a static reserved IP address and subnet mask for the local network on the internal network adapter. You should not use DHCP.
For the external network card, it is recommended that you disable the following:
- File and printer sharing.
- Register this connection in DNS.
- NetBIOS.
- Client for Microsoft networks.
There are a number of services that can be disabled on the ISA Server:
- Computer browser.
- Distributed file system.
- Distributed link tracking.
- Fax service.
- License logging.
When determining hard disk size and requirements for your ISA installation, consider the following important factors:
- To improve hard disk performance and redundancy, consider using Redundant Array of Independent Disks (RAID) arrays. Because server disks need to be fast and reliable, grouping drives so that they perform together to provide speed and fault tolerance is a solution that can be implemented to achieve this. This solution is commonly known as Redundant Array of Independent Disks RAID. Fault tolerance is the use of hardware and software to prevent data loss in the occurrence of a failure such as a system or hardware failure. Software-based RAID is included in the operating system, and the operating system bears the costs for maintaining the RAID solution Software RAID is put into operation through software and needs no special hardware for it to be implemented. RAID fault tolerance can be implemented as hardware-based RAID. Hardware RAID uses special disk controllers and exclusive drives. Hardware-based RAID is faster and more fault tolerant than software RAID. It is also simpler to recover from failure when RAID is implemented in hardware than software RAID.
- Use RAID level 1 to mirror the operating system. Two disks partake in a mirrored volume. This configuration is also known as a mirror set. With mirroring, two copies of all data are written to separate volumes on two different disks. In the case where one disk fails, the remaining disk in the mirror volume set has an identical copy of the data. RAID 1 is frequently used to protect the drive where the operating system is situated. It is a good initiative to mirror the boot and system volume to ensure that you can boot the server in the event of a single drive failure. You only need two physical disks to create a mirror volume set. It is also possible to mirror an existing simple volume set, thereby making it fault tolerant.
- You can improve fault tolerance by separating the ISA Server Web cache and the ISA Server logs.
- Consider using Web cache space on multiple drives to provide fault tolerance. This would mean that should one drives crash, the failure is isolated to the cached data on that specific drive only. The other drives would still be able to operate as usual.
- Use a RAID level 5 array for logs. RAID 5 uses disk striping with parity. Fault tolerance ensures that a single drive failure does not result in the whole set being down. To enable fault tolerance, RAID 5 writes parity information with the blocks of data. Whenever data is written to RAID-5 volumes, it is written across all the striped disks in the RAID 5 volume, and parity information for the data is also written to disk. Parity information is written to a separate disk from that disk holding the matching data. A disk in the RAID-5 volume can hold a portion of the data, or the parity information which would be used to reconstruct the contents of a lost disk. The original data and parity information is not stored on the identical disk. This parity information is then used to recover the data when a disk in the striped set fails.
When you install ISA Server, you can choose between different installation options. You need to determine which installation options you are going to be installing when you deploy ISA Server:
- ISA Management only.
- ISA Server Services; installs:
- Firewall service.
- H.323 Gatekeeper service.
- Web Proxy service.
- ISA Server Extensions; installs:
- Message screener.
- H.323 administration tool.
You also need to determine which ISA Server mode you are going to be using:
- Firewall mode.
- Cache mode.
- Integrated mode.
Firewall mode and Cache mode offer different features. When determine which mode to use, you need to consider the specific features provided by each ISA Server mode:
The features provided by Firewall mode are:
- Access policy.
- Alerts.
- Application filters.
- Enterprise policy.
- Packet filtering.
- Real-time monitoring.
- Reports.
- Server publishing.
- Web publishing.
The features provided by Cache mode are:
- Access policy (for HTTP only).
- Alerts.
- Cache configuration.
- Enterprise policy.
- Real-time monitoring.
- Reports.
- Web publishing.
When determining ISA Server cache placement, consider the following important factors:
- You should use a hard disk volume formatted with NT file system (NTFS).
- You should use a local drive and not a network drive.
- You need at least 5MB to install the ISA Server cache.
- The ISA Server installation drive and the cache drive should be separated. This will improve performance.
- You can configure multiple drives to contain part of the ISA Server cache.
There are also a few Windows specific installation considerations. You can only install ISA Server on a Windows 2000 Service Pack 1 or above computer.
A few Windows specific installation considerations are listed here:
- Before you install ISA Server, check the Microsoft Web site for any service Packs and hotfixes that have to be installed on the computer.
- The SMTP service must be installed if you are planning to use the ISA Server Message screener option.
- It is recommended that you do not install ISA Server on a domain controller. You should instead install ISA Server on a domain member server or on a standalone server.
There may also be a number of existing services, servers, and applications that ISA Server interoperates with. You should consider the impact of ISA Server on existing services, servers, and applications.
A few recommendations are listed here:
- With regard to existing Windows NT 4.0 domains; you can install ISA Server on a standalone Windows 2000 server in a Windows NT 4.0 domain.
- When it comes to ISA Server arrays and Windows NT 4.0 domains, ISA Server arrays have to be installed on a Windows 2000 domain. If you have to support Window NT 4.0 clients, you can use an Active Directory trust relationship to join the Windows 2000 domain to the Windows NT 4.0 domain.
- Routing and Remote Access Service (RRAS) can run on the ISA Server. Here ISA Server can be used to extend RRAS. You should though use ISA Server to provide Internet connectivity for your internal clients. It is recommended that you use ISA packet filtering over using RRAS packet filtering.
- You can also configure ISA Server as an IPSec/L2TP VPN server.
- You can install Terminal services on the ISA server if you want to be able to remotely administer ISA Server.
- If you need to support network management devices, you can have the SNMP service installed.
- While you do not need IIS on the ISA server, you can install it. It is recommended that you then define Web-publishing rules if public users need to access the Web server. The IIS server should also be configured to listen to a port other than port 80.
- When you install ISA Server, you no longer need Internet Connection Sharing (ICS).
Migrating from Proxy Server 2 Considerations
If you are planning to migrate from Proxy Server 2 to ISA Server, there are some additional planning considerations and actions you need to perform:
- When migrating from Proxy Server to ISA Server, the computer being upgraded must be running Proxy Server 2 on Windows 2000 Service Pack 1 or above.
- When migrating from Proxy Server to ISA Server where Proxy Server is running on Windows NT 4, you first have to upgrade the server to Windows 2000. Stop all Proxy Server services and upgrade to Windows 2000.
- If you want to upgrade to Windows Server 2003, ISA Server must be running Service Pack 1 or above.
- When your internal clients currently use the IPX/SPX protocol, then you need to install the TCP/IP protocol and configure your internal clients to use TCP/IP. This is necessary because of ISA Server not supporting the IPX/SPX protocol.
- When you are migrating a Proxy Server array, then you have to first remove all array members from the Proxy Server array. When you run ISA Server Setup, you have to create an ISA Server array and then move each of the removed Proxy Server array members to the ISA Server array.
- If you are migrating a Proxy Server array to a stand-alone ISA Server, almost all of your Proxy Server settings are migrated. This includes configured Proxy Server rules, existing network settings, cache configuration information and monitoring configuration will be moved to ISA Server during the migration.
- If migrating a Proxy Server array to an ISA Server array, your enterprise policies will determine how Proxy Server settings are migrated.
Existing Proxy Server rules and configuration information is migrated to the ISA Server computer as follows:
- Proxy Server 2 domain filters to ISA Server site and content rules.
- Proxy Server 2 Winsock permission settings to ISA Server Protocol rules.
- Proxy Server 2 static packet filters to either ISA Server allow IP packet filters or block IP packet filters.
- Proxy Server 2 publishing properties to ISA Server Web publishing rules.
- Proxy Server 2 Web Proxy routing rules to ISA Server routing rules.
How to disable unnecessary services
- Click Start, Programs, Administrative Tools, and then Services.
- The Services console opens.
- Select the service that you want to disable.
- Right-click the service and select Stop on the shortcut menu.
- After the service has stopped, right-click the service once more, and then select Properties from the shortcut menu.
- In the Startup Type drop-down list, select the Disable option.
- Click OK.
How to configure properties for the external network card connection
- Access the Properties sheet of the external network card connection.
- On the Components Checked Are Used By This Connection window, clear the File and Printer Sharing for Microsoft Networks and Client for Microsoft Networks checkbox.
- Select Internet Protocol (TCP/IP) and then click Properties.
- The Internet Protocol (TCP/IP) Properties dialog box opens.
- Switch to the DNS tab.
- Clear the Register This Connection’s Addresses in DNS checkbox.
- Switch to the WINS tab.
- Select the Disable NetBIOS over TCP/IP option.
- Click OK.
|
|
Comments - No Responses to “Planning for ISA Server Installation”
Sorry but comments are closed at this time.