
How to Map a Network Drive
Mapping a network drive is extremely quick and easy. When someone maps a network drive he/she is configuring a file folder on a remote computer that can share files or folders of data over a Local Area Network (LAN). Users can map a network drive with Window Explorer if they are running Windows XP. Users can also use the MS-DOS prompt to map their network drive.
Map a Network Drive in Windows XP
Right click on the start button and select Explore, then the menu bar will appear at the top. From this menu bar, select Tools, click on the option to Map Network Drive, and a new window will popup.
Once a new Map Network Drive window pops up, it will ask the user to choose a drive letter. A drop down list will display the available drives. If the user already has mapped drives, a shared folder name inside the drop down list corresponding with the drive letter will indicate them.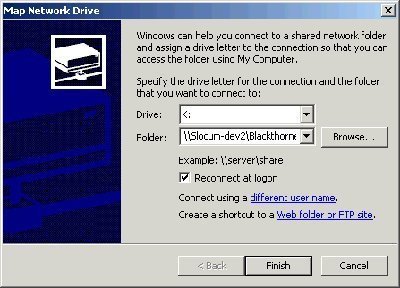
Once the folder to map from the drop down list is selected, name it. It is important to note that users must name this file following the UNC (Universal Naming Convention). This naming convention is used to identify resources on a network. The UNC usually has three parts: the server name, the share name, and the file path, which is optional, but used often. All three of these parts can be combined with backslashes. For instance: serversharefile_path
Besides typing in the UNC by hand, users can also just click the Browse button, which can be used to search and choose the correct folder.
Once the drive letter and the folder to map out are selected, click the “Reconnect at Login” check box. This checkbox should only be checked to make this network drive permanent. Otherwise, after logging out of the computer it will un-map the drive. Another option is if the remote computer needs to have a different username and password in order to log in. Easily input this info by clicking on the hyperlink and entering the information. Click Finish. If there are any problems mapping the network drive, an error message will pop up. The error message might say that the computer was unable to map the drive, at this point, check to make sure the folder was named properly. Another possible message the user may receive is if the drive was previously mapped to a different location. Usually, the computer will ask the user to replace the existing connection with the new one that he/she specified. Click yes and the computer will disconnect and un-map any older connections.
It is important to note that a mapped network drive can be disconnected at any time. Just right click on the Start button, click the Tools menu, and click Disconnect Network Drive. From here, follow the prompts.
Mapping a Network Drive with a Command Shell
Map a network drive with a command shell and the “net use” command.
Open a command shell. Click the Start button and the Run option, then type “command” in the field and press enter.
The command will be similar to the one found below:
net use j:computerfolder
The “j” represents the drive letter that will be mapped and the computer folder is the new shared network path.
Be sure to use back slashes and not forward slashes when mapping a network drive. It is also important to note that if the drive is not available or not online, it cannot be mapped.
|
|
Comments - 2 Responses to “How to Map a Network Drive”
Sorry but comments are closed at this time.