
Creating and Configuring SMS Site Hierarchies
In large organizations, having one SMS site for the management of all your network resources is not really the ideal solution. Here, implementing a site hierarchy that has multiple SMS sites is the better solution.
A SMS site consists of the following SMS components:
- SMS site server
- SMS site systems
- SMS clients and resources
The SMS hierarchy is the structure that links multiple sites together. The SMS hierarchy is created by linking sites together so that parent-child relationships can be formed:
- Parent site: This is a SMS site that contains one or multiple additional child sites beneath it. A parent site can manage each child site located beneath it in the SMS hierarchy.
Parent sites send the following information to their associated child sites:
-
- Collection information
- Package definitions
- Advertisements
- Site control information
- Child site: This is a SMS site that has a parent site residing over it in the hierarchy. The child site is managed by its associated parent site.
Child sites send the following information to their direct parent sites:
-
- Discovery information
- Inventory information
- Site control information
- Status messages.
Parent and child sites are defined by their relationship in the SMS hierarchy. There are also two different types of SMS sites that assist in organizing the administration of the SMS environment: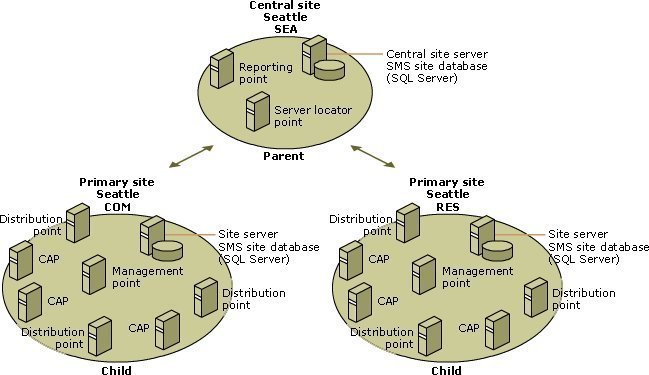
- SMS Primary site
- SMS Secondary site
A SMS primary site has the following characteristics:
- A primary site has access to the SQL Server database.
- A primary site can have SMS child sites beneath it in the SMS hierarchy.
- A primary site can be a child site of another SMS primary site.
- A primary site can be managed using the SMS Administrator console.
- The primary site can manage any child site beneath it in the SMS site hierarchy.
- Where a primary site is a child site of another SMS primary site, that specific SMS primary site can manage it.
A SMS secondary site has the following characteristics:
- A secondary site does not have access to the SQL Server database.
- A secondary site is at all times a child site of a SMS primary site.
- A secondary site cannot contain another child site.
- A secondarysite is managed by the parent site residing over it within the SMS site hierarchy.
A central SMS primary site is the primary site located at the top of the SMS site hierarchy. A central site has the following characteristics:
- It is the topmost site in the SMS site hierarchy.
- A central site can manage all SMS sites which exist beneath it in the SMS hierarchy.
- All database information is collected at the SMS database of the central site. Information is passed from the child site to the parent site.
- The central site can pass information down the SMS site hierarchy, to each of its child sites.
Determining SMS Hierarchy Requirements
The more layers added to the SMS hierarchy, the greater the impact on performance of parent sites. The processing load of parent sites increases as more child sites are added beneath it.
The data passed from a child site to a parent site are listed here:
- Discovery data records (DDRs)
- Inventory data
- License balancing data
- Site control files
- Status messages
The data passed from a parent site to its associated child sites are listed here:
li>Advertisements
- Collections
- Package definitions
- Site control files
- Software metering data
The more parent-child relationships formed within the SMS site hierarchy, the greater the volume of data which is passed from child sites to parent sites; and from parent sites to child sites.
A few factors that you should consider when creating the SMS site hierarchy are listed below:
- The physical network structure and the requirements of the organization will determine whether a flat and wide hierarchy or a steep and narrow hierarchy will be employed. A flat and wide hierarchy has multiple site servers with fewer clients. A steep and narrow hierarchy on the other hand has fewer servers and numerous clients.
- With a flat hierarchy, managing and maintaining the site database is simpler.
- The more levels within your hierarchy, the more time needed for configuration modifications to move up/move down the hierarchy.
- The time restraint with regard to site failures is another factor that needs to be considered. With a flat and wide hierarchy, the loss of connectivity with a site server would have less of a negative influence on the entire SMS hierarchy as would be the case with a steep and narrow hierarchy. With a steep and narrow hierarchy, the loss of a site server that contains numerous child sites would have a bigger impact on the entire site system.
- The expected traffic volumes between the sites in the hierarchy affects the network links which connect the sites within hierarchy.
- The sites that have to communicate over WAN connections have an impact on the maintenance costs of your SMS design as well.
Installing Secondary Sites
You can install a secondary site using either of the following methods:
- Install the secondary site from a parent primary site
- Install the secondary site locally, by using the SMS CD
When you create a parent-child relationship, a number of status messages are generated by SMS:
- The Hierarchy Manager sends status message codes 3306 and 3307 that pertain to the processing of the site control files at the SMS parent site.
- The Discovery Data Manager sends status message codes 2603 and 2607. These messages pertain to the transferal of discovery data to the parent site. The Discovery Data Manager also sends status message codes 2611and 2634. These messages deal with the updating of child discovery information at the parent.
- The Inventory Data Loader sends a number of status message codes (2708, 2709, 2711, 2713) that pertain to the transferal of inventory data to the parent site.
- The Replication Manager sends status message code 4000 which deals with the creation of jobs to send information to the SMS parent site.
How to install the secondary site from a parent primary site
- Open the SMS Administrator console.
- Locate the primary site that you want to install the secondary site for.
- Right-click the primary site and then select New and then Secondary Site from the shortcut menu.
- The Create Secondary Site Wizard initiates.
- Click Next on the Welcome To The Create Secondary Site Wizard screen.
- On the Site Identity page, provide the following information for the new secondary site:
- In the Site code field, provide a three character site code. The code that you specify has to be unique in the SMS hierarchy.
- In the Site name field, enter a descriptive name for the site that details the purpose or location of the site.
- In the Comment field, enter a meaningful description for the secondary site that you are installing.
Click Next.
- On the Site Server page,
-
- In the Site server domain field, provide the name of the domain wherein the site is located.
- In the Site server field, provide the server name.
- In the Processor platform field, specify the processor platform.
- In the Installation directory, specify the location of the NTFS installation directory.
Click Next.
- On the Installation Source Files page, specify the location from where the secondary site’s source files should be obtained:
- Select the Transfer Installation Source Files From Parent Site Server checkbox to use the installation files from the primary site server.
- Select the Installation Source Files Are On A CD-ROM At Secondary Site Server checkbox to use the source files on the SMS installation CD.
Click Next.
- On the SMS Service Account page,
- In the Account Name field, provide the name of the SMS Service account which you will be utilizing.
- In the Password field and Confirm Password field, enter the password for the SMS Service account.
Click Next.
- On the Addresses To Secondary Site page, select either of the following options:
- No, Proceed with site creation option.
- Yes, Create a new address option.
- Selecting the Yes, Create a new address option opens the New Address To Secondary Site page. Provide the following information for the address to the secondary site:
- In the Address type field, specify the sender address type.
- In the Destination site server field, ensure that the correct site server name is provided.
- In the Account field, ensure that the correct account is specified for connecting to the secondary site.
Click Next.
- In the New Address To Parent Site page, provide the following information:
- In the Address type field, specify the sender address type.
- In the Destination site server field, ensure that the correct site server name is provided.
- In the Account field, ensure that the correct account is specified for connecting to the primary site.
Click Next.
- The Completing The Create Secondary Site Wizard page is displayed.
- Click Finish.
How to install the secondary site by using the SMS CD
- Insert the SMS 2.0 CD and select Set Up SMS 2.0 from the autorun menu to start the SMS Setup program.
- Click Next on the Welcome to Systems Management Server Setup Wizard screen.
- On the System Configuration screen you can click Next as well. Here, SMS Setup checks whether the computer has a previous version of SMS installed.
- When the Setup Options screen is displayed, select the Install An SMS Secondary Site option and then click Next.
- On the Product Registration screen:
-
- Provide a name in the Name box
- Enter the organization name in the Organization box.
- Enter the CD product key in the Product ID field
Click Next.
- On the SMS Site Information screen:
-
- In the Site code field, provide a three character site code. The code that you specify has to be unique in the SMS hierarchy.
- In the Site name field, enter a descriptive name for the site that details the purpose or location of the site
- In the Site domain field, enter the domain in which the site is being installed.
Click Next.
-
On the SMS Service Account Information screen:
-
-
In the Account name field, provide the name of the SMS Service account which the secondary site will be using.
-
In the Password field and Confirm password field, enter the password for the SMS Service account.
-
Click Next.
-
On the SMS Server Platform screen, enter alternate platform file support. This is necessary only if the secondary site must support a mixed platform environment. Click Next.
-
On the Setup Installation Options screen, select the SMS components that should be installed. Click Next.
-
On the Parent Site Information/Identification screen, provide the following information:
-
-
In the Parent site code field, provide the site code of the parent primary site.
-
In the Parent site server name field, specify the name of the parent primary site.
-
Choose the connection type which the secondary site will utilize for connecting to the parent site.
-
Click Next.
-
On the Connection Account Information screen, provide the following information:
-
-
In the Account name field, provide the name of the account which the secondary site will be using to connect to the parent primary site.
-
In the Password field and Confirm Password field, provide the password for this particular account.
-
Click Next.
-
The Completing The Systems Management Server Setup Wizard page is displayed.
-
Click Finish.
How to create an address to another SMS site
-
Open the SMS Administrator console.
-
Expand the Site Settings node.
-
Right-click the Addresses folder and select New, and then select the sender address type from the shortcut menu. The sender address types that you can choose between are:
-
Standard Sender Address
-
Asynchronous RAS Sender Address
-
ISDN RAS Sender Address
-
X.25 RAS Sender Address
-
SNA RAS Sender Address
-
Courier Sender Address
-
-
If you selected the Standard Sender Address type, then the Standard Sender Address Properties dialog box is displayed. In the Destination site code textbox, provide the proper site code for the site. In the Site server name textbox, enter the site server of the target site. Click the Set button to provide the details of an account that has the necessary Change permission for the SMS_SITE share on the target site.
-
If you have selected the Asynchronous RAS Sender Address type, then the Asynchronous RAS Sender Address Properties dialog box is displayed. In the Destination site code textbox, provide the proper site code for the site. Specify the RAS phone book entry in the Phone book entry textbox. Click the Set button in the RAS access area of the Asynchronous RAS Sender Address Properties dialog box, to provide the dial-up access account and phone number which will be utilized to dial in to the target site. In the Site server name textbox, enter the site server of the target site and the domain information. Click the Set button in the Destination access area of the dialog box to provide the details of an account that has the necessary Change permission for the SMS_SITE share on the target site.
-
If you have selected the X.25 RAS Sender Address type, then the X.25 RAS Sender Address Properties dialog box is displayed. In the Destination site code textbox, provide the proper site code for the site. Specify the RAS phone book entry in the Phone book entry textbox. Click the Set button in the RAS access area of the X.25 RAS Sender Address Properties dialog box, to provide the dial-up access account and phone number which will be utilized to dial in to the target site. In the Site server name textbox, enter the site server of the target site and the domain information. Click the Set button in the Destination access area of the dialog box to provide the details of an account that has the necessary Change permission for the SMS_SITE share on the target site.
-
If you have selected the SNA RAS Sender Address type, then the SNA RAS Sender Address Properties is displayed. In the Destination site code textbox, provide the proper site code for the site. Specify the RAS phone book entry in the Phone book entry textbox. Click the Set button in the RAS access area of the SNA RAS Sender Address Properties dialog box, to provide the dial-up access account and phone number which will be utilized to dial in to the target site. In the Site server name textbox, enter the site server of the target site and the domain information. Click the Set button in the Destination access area of the dialog box to provide the details of an account that has the necessary Change permission for the SMS_SITE share on the target site.
-
Click the Schedule tab.
-
By default, the sender is available for all the priority send requests, and it is available all the time. You can modify this behavior on the Schedule tab.
-
In the Availability list, you can choose between the following options:
-
Open For All Priorities
-
Allow Medium And High
-
Allow High Only
-
Closed
-
-
If you do not want the sender to be utilized as an alternative sender, then click the Unavailable To Substitute For Inoperative Addresses checkbox.
-
Click the Rates Limit tab.
-
By default, SMS is able to utilize any amount of bandwidth needed to pass data to the target site. To change this, click the Limited To Specified Maximum Transfer Rates By Hour option and then set the appropriate time period.
-
In the Rate Limit For Selected Time Period area of the Rate Limits tab, set the desired bandwidth percentage.
-
Click OK.
How to define the parent site of a child site
After you have configured the address to a parent site, you can then specify the parent site for that particular child site:
-
Open the SMS Administrator console.
-
Locate the site that you want to configure.
-
Right-click the site and then select Properties from the shortcut menu.
-
The Site Properties dialog box opens.
-
Click the Set Parent Site button on the General tab.
-
The Set Parent Site dialog box opens.
-
Click the Report To Parent Site option.
-
Provide the site code of the parent site.
-
Click OK.
-
Click OK in the Site Properties dialog box.
How to remove a secondary site server
-
Open the SMS Administrator console.
-
Locate the secondary site which you want to remove.
-
Click the secondary site
-
Click the Action menu.
-
Select Delete.
Understanding Site-to-site communication
In SMS, site hierarchies are created when the following events occur:
-
One primary site is connected to another primary site.
-
A secondary site is created, which connects to a primary site.
There are a number of SMS components which are used to send data from site to another site, of which, the main components are listed here:
-
Scheduler
-
Replication Manager
-
A sender
To enable multiple sites in a SMS hierarchy to communicate, the SMS Senders are used to send information between sites which are connected.
SMS 2.0 provides various senders:
-
Senders for dedicated connections are called standard senders.
-
Senders for dial-up connections are called RAS senders.
-
Senders for offline package communications with removable media are called the Courier Sender.
In SMS, senders are able to communicate over the following connectivity systems:
-
LAN/WAN using TCP/IP, NetBEUI, or IPX/SPX transport protocols
-
Remote Access Server (RAS) systems which use asynchronous, Systems Network Architecture (SNA), X.25 or Integrated Services Digital Network (ISDN) lines.
-
Removable media
In order for two SMS sites to pass information between each other, the following set of requirements has to be met:
-
The necessary connectivity system software must be installed and configured correctly.
-
The site partaking in communication must have the necessary senders installed, and must be correctly configured.
-
The sites must have the address of the other site.
The Standard Sender and Courier Sender are created automatically when a primary site server is installed. You can use the SMS Administrator console to create any additional senders.
How data is sent from one site to another site
-
Data transfers are initiated by the Scheduler. The Scheduler passes the data to the appropriate sender who then sends the data to the other site.
-
The Scheduler is responsible for preparing the packages and the instructions for sending. The Scheduler creates a send request file and then places the send request file in the proper sender’s outbox.
-
Each sender is responsible for monitoring its own outbox. When data needs to be sent, that sender sends the data.
-
At the destination site, the Despooler decompresses the received data and then passes it to the Replication Manager.
How to configure a new sender
-
Open the SMS Administrator console.
-
Expand the Site Settings node.
-
Click the Senders folder. The default sender, Standard Sender, is displayed. Although the Courier sender is also installed by default, it is not displayed.
-
Right-click the Senders folder, select New, and then select the appropriate sender type from the shortcut menu
-
Provide the server name on which the sender should be created.
-
Click the Advanced tab.
-
Provide the appropriate value for Maximum Concurrent Sendings.
-
Enter the appropriate value for Retry Settings.
-
Click OK.
How to configure the Courier Sender
-
Open the SMS Administrator console.
-
Expand the Site Settings node.
-
Right-click the Addresses folder and select New, and then select Courier Sender Address from the shortcut menu.
-
The Courier Sender Address Properties dialog box opens.
-
Enter the destination site code.
-
Click OK.
How to create outgoing parcels
-
Open the Courier Sender Manager.
-
Click the File menu and select Create Outgoing Parcel.
-
Choose the package from the available list and click Next.
-
Enter a name for the parcel.
-
Provide a tracking name.
-
Specify the method for sending the parcel.
-
Provide a description. Click Next.
-
Provide the path for saving the parcel, and click Next.
-
Click Finish. The new parcel is created.
How to receive a parcel
-
Open the Courier Sender Manager.
-
Click the File menu and select Receive An Incoming Parcel.
-
Click Browse and then choose the package from the available list and click Open.
-
Click Next and then click Finish.
|
|
Comments - No Responses to “Creating and Configuring SMS Site Hierarchies”
Sorry but comments are closed at this time.