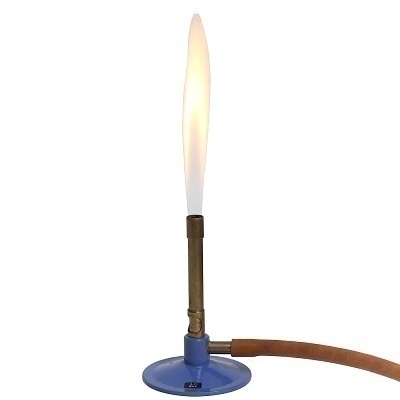
What is a Bunsen Burner?
Bunsen burners are used in laboratories to heat materials or substances for experiments. The burners are gas-driven and have a flame that is adjusted by the amount of air and gas that is supplied to the unit. Many laboratories have started to use electric hot plates in place of Bunsen burners for experiments because they are less flammable and produce a cleaner heat. However, many academicians and researchers still use the traditional burner.
How is a Bunsen Burner Designed?
A Bunsen burner has a metal tube that is placed at a ninety degree angle to a weighted base. The tube is connected to the base, which has a nozzle that a gas fuel source feeds and a valve that regulates the amount of fuel fed to the burner’s tube. There is also a fuel adjuster on the base to regulate the amount of air fed to the tube through small holes. The tube is lit manually and can be set upon a stand for experiments or the researcher may use tongs to hold materials over the flame.
Who Invented the Bunsen Burner?
Michael Faraday invented the Bunsen burner in the 1800s in order to assist the researchers in Robert Wilhelm Bunsen’s laboratory conduct experiments. Peter Desaga, who also worked in the lab, further refined the original burner and called it the Tirrill burner, which gave greater control over the flame’s intensity and height. This later invention is now known as the Bunsen burner.
Bunsen Burner Safety Precautions
Over the years, there have been a number of laboratory accidents associated with the Bunsen burner. These have primarily been burn related, resulting in new students or researchers being trained in general safety requirements when working around flammable gas or exposed flames. Common safety precautions include keeping hair and clothing secure, keeping flammable materials away from the flame, and ensuring that the flexible rubber hose that connects the Bunsen burner to the gas nozzle is secure with no leaks.
How to Light and Adjust a Bunsen Burner
A common task for the student or researcher is lighting and adjusting the Bunsen burner for an experiment. The hottest part of a Bunsen burner flame is the blue flame, which can reach temperatures in excess of 700°C. The safest or coolest flame is yellow or orange and is 300°C. It shows that the burner is turned on.
Step 1 – Connect the Bunsen burner hose to the gas outlet with the outlet handle in the closed position. To verify that the outlet is closed, the handle should be turned to a right angle as it relates to the gas pipe.
Step 2 – Open the valve on the gas pipe by turning it parallel to the pipe, then open the gas adjustment on the Bunsen burner’s base to ensure adequate fuel flow to the device.
Step 3 – Hold a match to the side of the burner’s mouth to light it.
Step 4 – Turn the burner’s barrel to adjust the air flow to the fuel source by unscrewing the barrel in a counter-clockwise direction.
Step 5 – Once the desired flame is produced after changing the air flow to the burner, the experiment may be conducted.


Comments - No Responses to “What is a Bunsen Burner?”
Sorry but comments are closed at this time.